Build an app using React Redux with TypeScript using the Redux-Toolkit package

In this tutorial, we will be seeing how to setup Redux using TypeScript in React using the redux-toolkit package. I had looked into many other articles and lectures, but no one was using the Redux Toolkit. The Redux Toolkit is a package that helps us to setup Redux in a simple manner. So, I will be going through a step-by-step process in setting up the Redux in React using TypeScript with the help of the Redux Toolkit.
Redux is a central store where all the components in the app can use the state or modify it. It is mostly used to avoid prop chaining as it can become confusing and difficult. The alternative that we can use is the React Context, but it becomes a disadvantage when building large products as it would become very complex. When there are high-frequency updates on the state, Redux is preferred. Some of the best use cases for Redux are:
- Authentication, as it is required by the whole app
- When there is data that needs to be shared among lots of components like the items in a shopping site need to be available in the cart, billing, and also in payment components.
The Redux-Toolkit is a very useful package that can be used to create a store. It helps to divide the store into slices (More into Later) and can easily combine the reducers for the store. The biggest benefit of using this package is that it allows to directly change the state in the reducers and overcome immutability. It is because, behind the scenes, the Redux-Toolkit package runs the Immer package. Read more about Immer here.
We will be creating a Todo Project with the help of the JSONplaceholder Api, which provides free fake REST API’s.
Step 1:
To create a React app with TypeScript, run :
npx create-react-app todo — template typescriptThe extra packages that we need to install are :
npm install react-redux
npm install @reduxjs/toolkit
npm install axios
Axios package is used to send http requests. It’s easier to use compared to Fetch, XMLHttpRequest and other ways to send http requests.
Step 2:

There are different ways we can group our code into folders for better understandability and ease of access. The Components Folder is used to store components that we will create here Todo. The hooks Folder is used to store custom hooks. The models Folder is used to store the interfaces that we require in typescript. The store Folder is where we setup the redux. The services Folder is where we setup axios and its services to send http requests.
Step 3:
Here we would be going through each File, and I would try to explain each line of code written.
So, we will first start with Models that we will be required to setup redux with TypeScript.
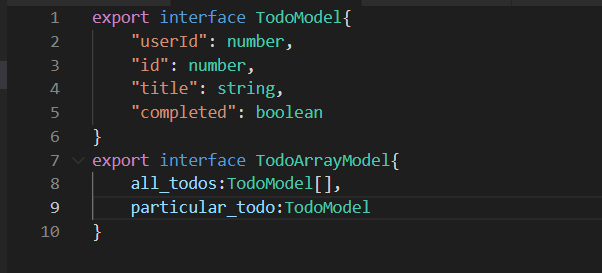
In this file, we can see the interfaces which would be used in redux store as a type.
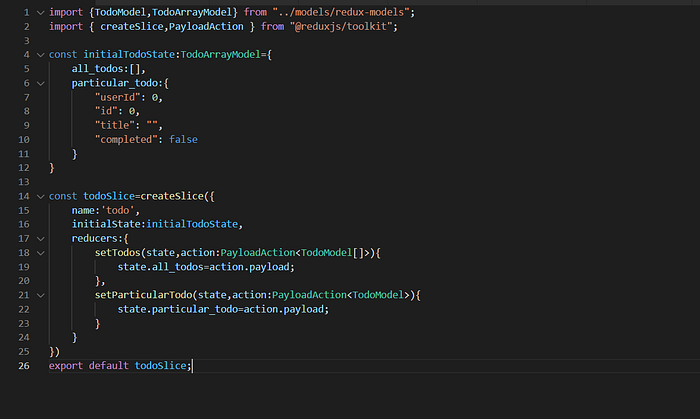
Here is where the creation of the slice takes place. So a store can have more than one slice. Each slice would have data and their reducers. One thing that we should remember is that reducers should be free from side-effects (http calls, timeouts) and they should be simple functions just to modify the state. All the asynchronous code should be taken care of in the actions.
Here we can see lots of states. So what is State?
State is like a current contents present in the store. Here the state is
{all_todos:[],particular_todo:{} }The state is like an object; here it contains a all_todos array and a particular_todo object and this state can be accessed anywhere in the app.
Next, we initialize the todoSlice with initialState and the reducers :
- setTodos(): It is used to set all the todos in the all_todos field.
- setParticularTodo(): It is used to set the particular todo based on id in the particular_todo field.
The reducers take in arguments state (which is the current state of the store so we can manipulate it ) and action of type PayloadAction<type> (it would have payload from the action call).
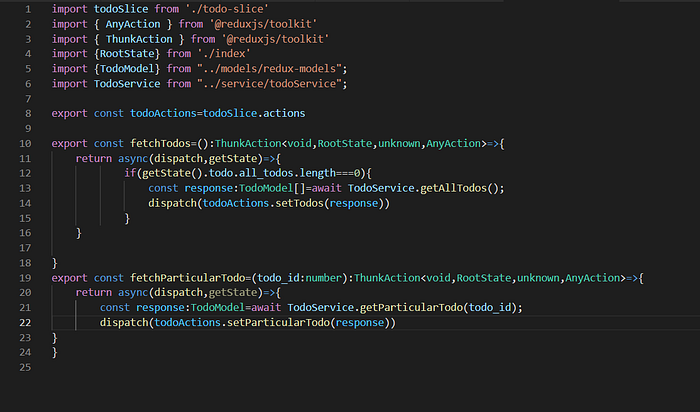
Here is where we define custom Actions. So here we define the fetchTodos() and fetchParticularTodo(). Here we are actually creating Thunks (it's a function that delays an action until later). Here is how we define them in TypeScript and we have to create them because, as said before, there is a side-effect that is an http call happening here.
We have to understand that redux-toolkit automatically creates actions with type and payload based on the reducers that are created by us in the slice. So those actions can be accessed from sliceName.actions (here todoSlice.actions )and we can call them using dispatch() function which dispatches the action and call the appropriate reducers based on the action type. We can see it below:
const todoActions= todoSlice.actions
dispatch(todoActions.setTodos())
Now we can see how we are setting up the axios for the http Call.
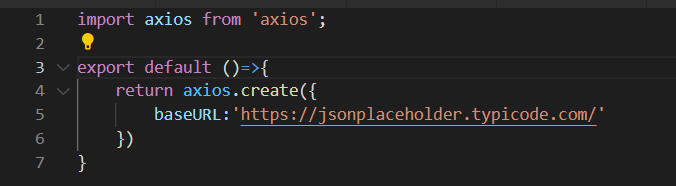

Here in Api.ts, we just setup the Axios with the baseURL, and in todoService.ts we define multiple functions to get data from the Fake Api. Async/Await is used when there is asynchronous code and where we need to wait until it has been fully executed before doing anything else. So from here, we get the data we require to store in the Redux.
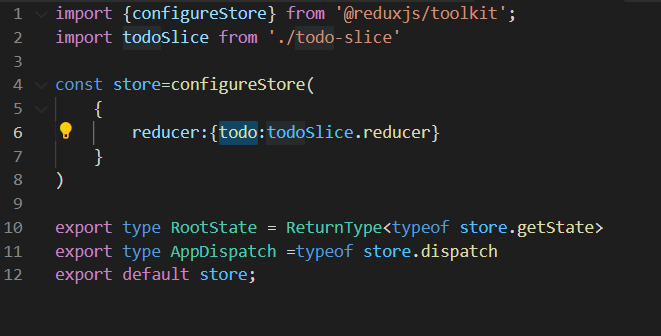
Here configureStore is a friendly abstraction over the standard Redux createStore function that adds good defaults to the store setup for a better development experience. It helps us to combine different reducers without using the combineReducers package.
So, here we also export the type RootState and AppDispatch type as they can be referenced as needed. Inferring these types from the store itself means that they correctly update as you add more state slices or modify middleware settings.

We have to use the useAppDispatch() and useAppSelector() instead of the useDispatch() and useSelector() because the custom hooks will take care of the type automatically and we need not worry about it and this the place where we use the imported RootState and AppDispatch from the store.
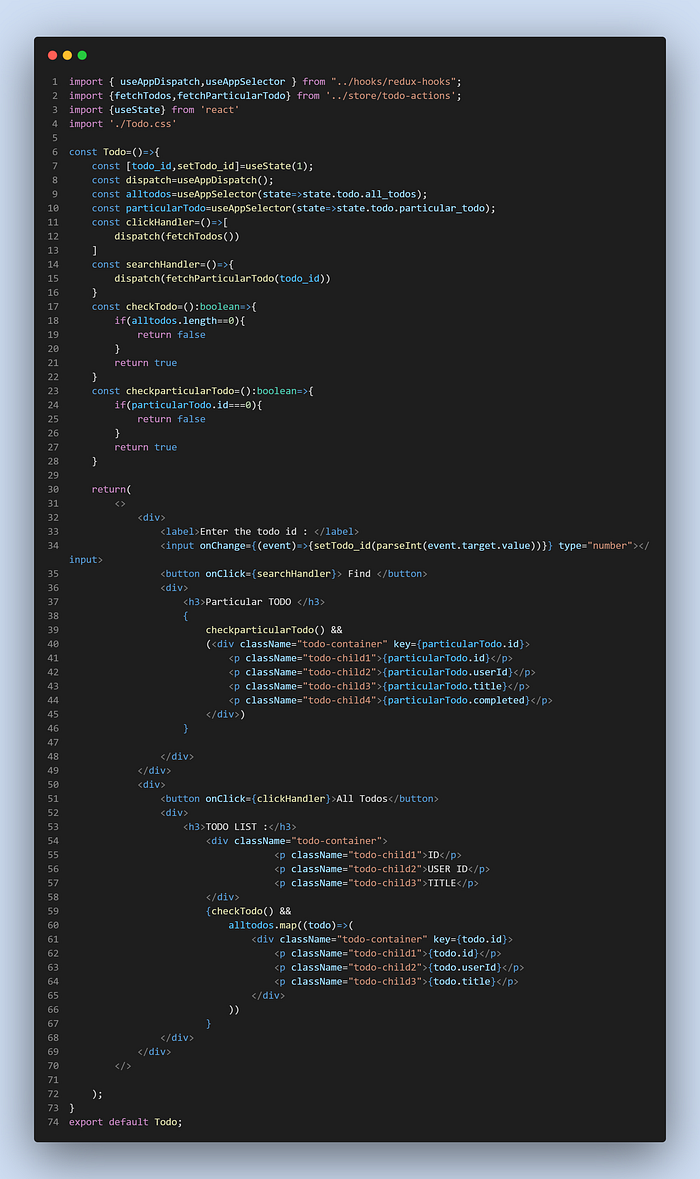
Here is the Todo Component, which is where we can display the particular todo and all the todos.
- useAppSelector(): This hook is used to get the particular state from the store.
const allTodos = useAppSelector(state=>state.todo.all_todos);- useAppDispatch(): This hook returns a function that is used to dispatch the actions, which in turn calls the corresponding reducers.
const dispatch=useAppDispatch();const clickHandler=()=>{ dispatch(fetchTodos())}
dispatch(fetchTodos()) => will call the fetchTodos() in the todo-actions.ts which does the http call and in-turn they dispatch(todoActions.setTodos(response)) => which calls the reducer setTodos() in the todo-slice.ts and they would update the state in the store.
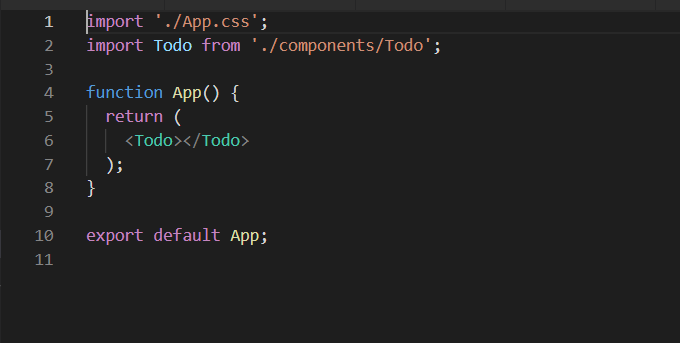
Here is where we import the Todo component and it is displayed here.
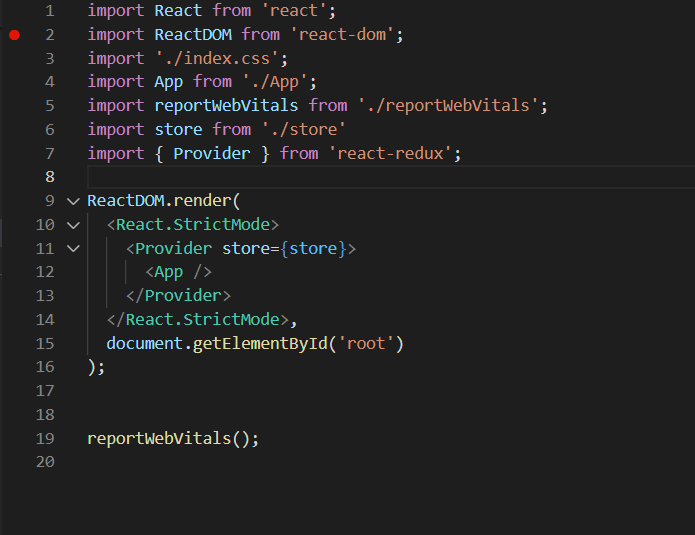
The last thing we have to do is to add the Provider tag around the App tag. This is done because any child components of the App would be able to access the store and can also make changes in them.
A cool extension that can be added to the google chrome browser is the Redux DevTools this will help you to debug the Redux if it has some errors. Click here.
Summary
In this article, we have understood how to setup a Redux Store using TypeScript and redux-toolkit package.
The entire project is also available in my GitHub repository.
If you liked this article, kindly click on that clap button & drop a comment below. Keep coding!!
Special Thanks:
https://www.udemy.com/course/react-the-complete-guide-incl-redux/
https://www.udemy.com/course/react-and-typescript-build-a-portfolio-project/